Thursday 31 December 2015

Engine painted!

The last pieces of the engine painting puzzle was the fiddly bits... inlet manifold, fuel rails, throttle body, coil packs etc...

PaintedLS10

PaintedLS09

PaintedLS07


Finished product...

PaintedLS12

PaintedLS11

PaintedLS13


One of the big inspirations for the orange/black theme has been this engine...


...from this '57 Chev LS conversion project.


We'll see how the exposed coil packs look for the moment. At some stage down the track I may well relocate them and go for the series 1 SBC rocker covers with adaptor plates.

The other option for the future is to swap-out the inlet manifold for one that maintains multi-point fuel injection, but has the throttle body in the same position as the traditional carburettor. Like so...


More info here.

J

Wednesday 23 December 2015

In the clear

A few days after the engine, it was the transmission's turn...

4L65Eclear10

4L65Eclear01


A good clean (...a VERY good clean...) and simply coating the trans in several coats of clear-coat did the trick.

J

Sunday 20 December 2015

Clean and paint, clean and paint...

With the engine and transmission apart, it was time to strip all ancillaries, get cleaning and mask-up in preparation for painting.

JtC did the vast majority of the work as my attendance was sporadic at best!

As they say, preparation is everything when it comes to paint and JtC was at his meticulous best...

OrangeLS_12

OrangeLS_13


Few coats of etch primer...

OrangeLS_16

Untitled


Then finally some colour; Chev Orange with black ancillaries/brackets for a retro feel...

OrangeLS_01

OrangeLS_24


Could not have been happier with the result!

J

Saturday 5 December 2015

Oil Pan

Time to swap the standard Holden VZ Commodore oil pan for the Holley LS conversion oil pan (Part No. 302-1) to suit B-bodies.

The 302-2 developed for A-body Chevs is not required (I hope!) as the Impala has the steering drag-link at the rear of the cross member and lower down, so there are no issues with the drag link fouling the sump.

Because the two lowest engine-to-transmission bolts picks-up the sump, the trans and engine need separating...

OilPan04

OilPan05


We lifted the 4L65E onto the workbench, ready for cleaning prior and hitting with a few coats of clear-coat.

With the sump off, we could have a look at the crank, underside of pistons and the base of the bores; looks pretty good...

OilPan07


Holley sump going on...

OilPan11


A very nice product from Holley; good bit 'o kit.

J


Tuesday 24 November 2015

Fuel Tank

I ordered a Tanks Inc. kit through Summit which included tank + pump + sender.

The only problem is that even though the kit is for a '65 Impala, the tank included in the kit was for an A-body (TM37-2T)...

Untitled


Once brought to their attention, Summit came to the party and sent me the correct tank (TM37C-T) straight away.

BIG thanks to Summit Racing and excellent customer service!

J

Wednesday 18 November 2015

Retro LS Swap Video

---------- Forwarded message ----------
From: Driver, John
Date: Wed, Nov 18, 2015 at 1:05 PM
Subject: 65 Impala - Retro LS Swap Video
To: JtC

Don't have sound here at work, but this looks goo-ood!

Start at 1:57…

Significant in a number of ways:

1.
Centre throttle body only (no throttle body injection) that maintains multi-point injection.

2.
Because I have no sound, I am not quite sure what he has done with the coils… are they the standard coils, arranged in a ring with a cap over the top to make it look like a dizzy?

3.
Perhaps most important, it maintains the PS pump on top with low-mount alternator. If that is the standard GM F-body (i.e. our) accessory drive arrangement, then things are looking promising for saving cash.

Interestingly there are no heat shields on the plug boots.

Also, it looks like they have used the heat-shrink hose clamps I was telling you about.


J

Monday 16 November 2015

Headers

From: John
Sent: Monday, 16 November 2015 12:06 PM
To: JtC
Subject: Headers


This guy has LS3 headers out of a Camaro…
Chevy Talk Forum Post
...and it looks like they fit in his ‘65 Impala LS swap.

And this guy has headers out of a 2010 Camaro...
Pale-yellow '66 Impala convertible build
...which fit fine.

They look *very* similar (identical?) to my LS2 headers. I am hoping that is the case as I am keen to keep my headers.

However… the HSV LS3 headers are definitely different…


We’ll just have to suck it and see during trial fitting.

J

Saturday 14 November 2015

OBD2 Display

Commandeered my old HTC Android phone to test the OBD2 software ("Torque") and a Bluetooth ELM327 adapter using my VE SS Commodore.


OBD2 ELM327 Testing

J

Sunday 8 November 2015

It lives!


We ignored supplying the starter solenoid through a relay and simply powered it via switched-power directly from the ignition switch... and ignored having a Park/Neutral inhibitor switch ;-)

The starter pack we had didn't have the herbs to kick it over so the battery from the Chev was quickly pilfered and pushed into surface.

We managed to forget to plug the vacuum hose to the brake booster (you can hear it in the video and JtC quickly found it), that was easily plugged with a bolt.

HUGE thanks again to JtC for all his work... especially his fab skills on the test frame, it is rock-solid!

J

Saturday 7 November 2015

Wiring

A nice aspect of the test frame being 100% steel is the ability to earth back through the frame as if it were a car body; plus the C-rails meant there were locations to easily connect/disconnect earth straps...

Wiring009


We - thankfully - kept the battery terminals/cables off the VZ, which were pressed back into service...

Wiring008

Wiring012


Wiring the ignition switch and testing...

Ignition Switch Wiring Test


Red = power from the battery
Brown/white stripe = accessories
Orange = ignition on
Purple = starter

Ignition Switch Wire Colours

J

Thursday 5 November 2015

Fans are go!


Red = positive 1st fan
Green positive = 2nd fan
Black = common negative
Not sure about yellow... low speed?

Wiring003


I've come to be a BIG fan (pardon the pun) of terminal strips! Perfect for temporarily wiring-up on the test frame.

J

Fuel pump sorted

Put 12V across it and it whirred away happily.

Purple/white = power
Black/white = earth


Normally it would be...
Solid purple = power
Solid black = earth

Because the VZ was a ute, it had a separate fuel pump control module to reduce the fuel pump speed (and therefore noise) under low demand as the pump is close to the cabin.

The white-striped wires connected the fuel pump to the fuel pump control module, with solid purple/solid black wired into the module from the harness on the computer side.

Make sense?

J

Friday 30 October 2015

Cooling System Part 2 + Fuel

Cooling system topped-off with a reservoir from a VY SS and heater hoses salvaged from the VZ were used to connect it up.

The steam pipe is temporarily blanked off in the photo, but we'll buy a hose and plumb it to the radiator...

Untitled


The fuel system was easy; we simply plumbed the fuel pump + filter from the VZ, using the stock lines...

Untitled


Complete, ready for wiring...

Untitled

J

Thursday 29 October 2015

Test Bed Cooling Plumbed

Radiator + thermo fans out of a VT Series 2 SS (thanks eBay) and radiator hoses to suit...

TestFrame009

TestFrame010

TestFrame011


We sat the radiator in some C-rail to pick up 2 x pegs in the base, on rubber pads to reduce vibration. A wooden block under the C-rail to give the right height, all tied-down with a mini ratchet strap and diagonally braced with some cable ladder...

TestFrame008

J

Friday 23 October 2015

Engine Test Frame

The plan is to run the engine/transmission outside the Chev, to get it sorted before the 327/Powerglide comes out, to try and minimise the downtime.

This all means a test frame needed to be made up to mount it all.

The design is a simple rectangular base using Dexion-style racking sections:

  • Long pieces were cut-down to the required length with the angle brackets salvaged and welded back on at the cut end. Cross pieces at each end and the centre.
  • 5PL feet on the end brackets for the 125 mm dia. castors (c/w lock-down brakes) to bolt to.
  • Along each long-side of the base, JtC stitch-welded short lengths of C-section at the location of the engine and the gearbox. This would allow us to adjust the positions of the engine and gearbox cross-members, before clamping them into position.
  • The gearbox uprights were C-rail sections with 100 x 50 x 5PL feet welded at each end. The feet allowed you to clamp-down on the base once the longitudinal position was reached.
  • Gearbox cross-member was UA 40 x 20 with 100 x 50 x 5PL welded at each end. The plated ends were clamped to the upright C-sections once the correct height was reached.
  • The engine cross member was heavier C-section to take the weight of the engine. Again, 5PL feet were welded to the ends to allow adjustment in the longitudinal direction, before clamping down.
  • The engine mount uprights had feet at both ends, bottom feet to pick-up the cross member C-section and top for the standard LS2 engine mounts to bolt to.

A simple that allow adjustment to suit a variety of engine/gearbox combinations. JtC's welding skills well and truly came to the fore!

With the base frame welded up, castors on and the engine/gearbox mounts in place, it was time to lift... action shot!

Untitled


Bolting-up...

Untitled


Like a bought one!

Untitled


With the L76 + 4L65E bolting in place, it is time to plumb the cooling circuit + fuel + electrics... stay tuned!

J

Thursday 22 October 2015

Gawwwnnn...!

With the VZ shell stripped of all required bits, it was time to get rid of the evidence.

After many weeks of no bites on eBay, it finally sold for the princely sum of $32!

The half-assembled engine test frame (in the foreground below) was pushed (literally) into service to get the front end onto the car trailer...

ShellRemoval002

Worked a treat too!

ShellRemoval001


Bye!

ShellRemoval003

J

Saturday 12 September 2015

Rear Brake Caliper Adjustment

Ever since converting to four wheel disc brakes, I have never been able to lock the rears and only just lock the fronts under hard braking. The Chev has always felt like it stopped well at low to medium demands, but hit the brakes hard and it would continue on further than I would have thought it would and certainly further than I like.

Time to try this: 
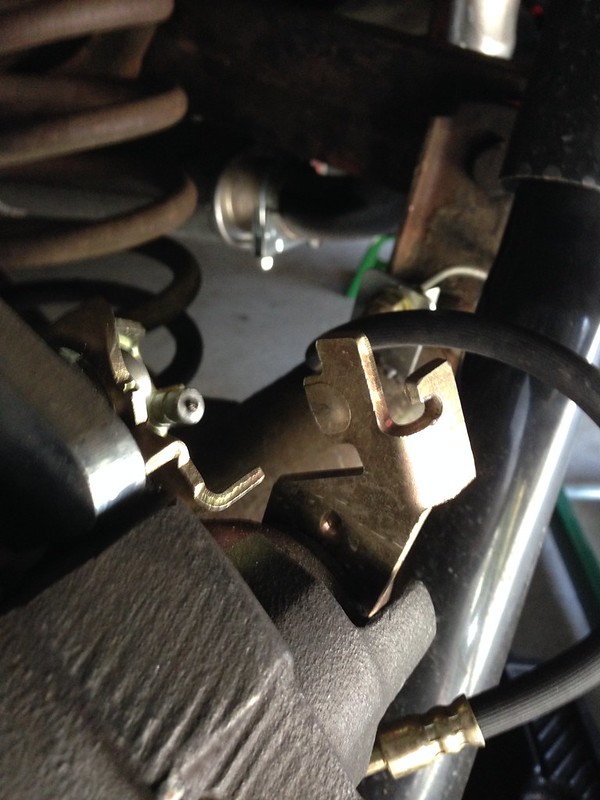
"Right Stuff" Rear Disc Installation Support

Up on stands, rear wheels off and pull the emergency brake actuation levers apart...

Wheel Off


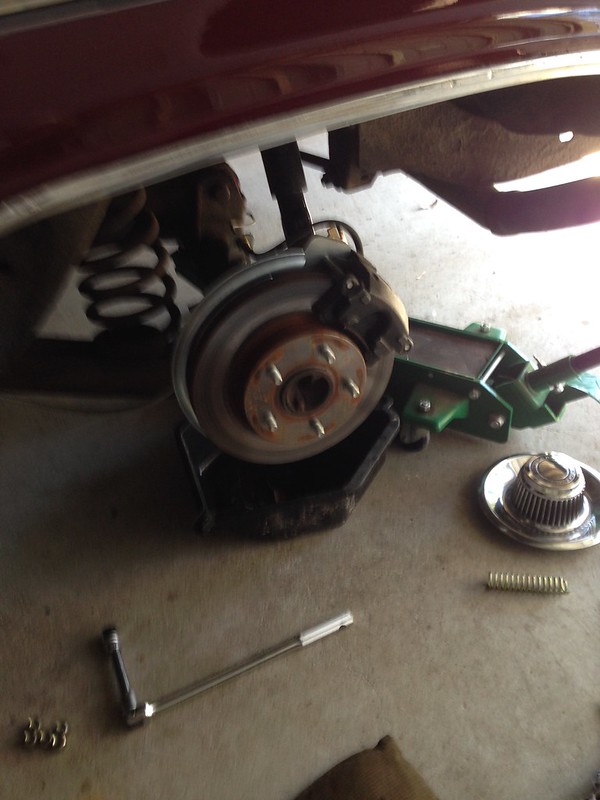
The rear discs didn't look like they had seen much use. Cross-hatching still visible....

Caliper + Pad + Rotor Hatching


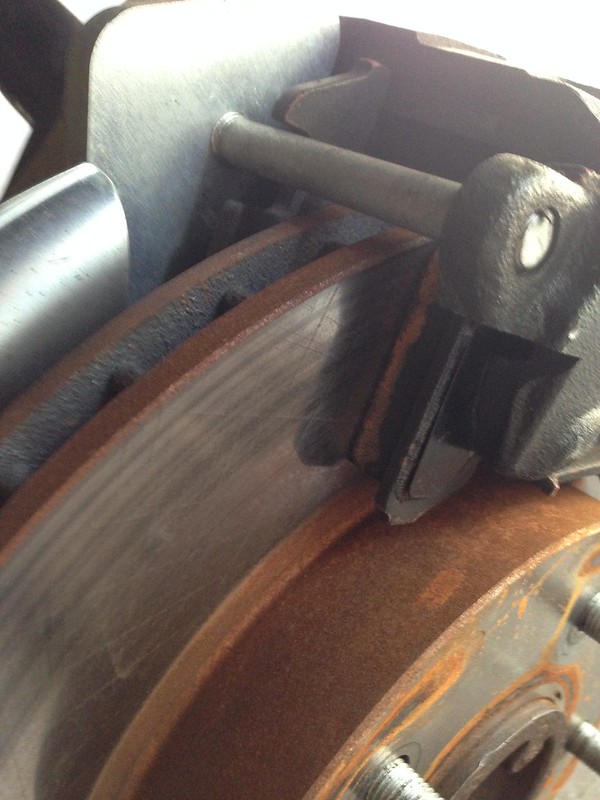
Adjusting the emergency brake actuation... the right rear was pretty good, though the left rear could be wound out a turn and still have the lever placed against the end stop...

Handbrake Lever - Spring + Cable Removed


Back together and go for a test drive. Much better!

The pulls up quicker and the brake balance is good. I managed to lock the right rear under hard braking on the way to the servo with an empty petrol tank. Once filled, the extra weight at the back meant all four tyres would be on the verge of locking under heavy braking, with a front locking preferentially.

No brake fluid escaped during the adjustment, but the pedal does get harder after one pump so a bleed wouldn't go astray.

I'll also double-check that I have adjusted the emergency brake correctly, so there is no slack in the emergency brake system when released, but the caliper actuation lever is still on the end stop.

J

Saturday 29 August 2015

Holley 302-1 Oil Pan + Suitable Dipstick

From: Holley
Date: Sat, Aug 29, 2015 at 3:52 AM
Subject: RE: HLY-000000000141427
To: J

J,
First page of the instructions had this little clip. Which means they are only designed to fit the LS3 tube unfortunately.

The Holley® LS Swap oil pans are designed to work with an LS3 dipstick and tube (if desired). Below are the part numbers:
· LS Dipstick – GM P/N 12634547
· LS tube – GM P/N 12625031

Thanks, Holley

From: J
Sent: Thursday, August 27, 2015 4:25 PM
To: Holley
Subject: Re: HLY-000000000141427

Thanks Holley,

I am using the pan on an L76. Can I use my standard dipstick, or do I need to go to an LS3 dipstick?

Best Regards, J

On Friday, August 28, 2015, Holley wrote:
Thank you for contacting Holley Performance Products.
The pan is designed to hold the 5.5 Qts.  The over all capacity with a filter is 6 Qts.  The filter hold oil as well creating the half qt extra.
Sincerely,
Holley

Your question was:
The product technical information makes the comment that the sump oil capacity = 5.5 Quarts Total Oil Capacity with stock oil filter. 6 Quarts Requires use of LS3 dipstick (GM P/N 12634547) and tube (GM P/N 12625031). My question is, what drives the decision to go to 6 quarts over 5.5 quarts?

If you have further questions, please reply directly to this email with history without altering the subject line.

Sunday 16 August 2015

Out!

One week later, the engine and gearbox was out of the VZ...

Out!

Half-way (geographically)


Now the fun begins...

Electrical Spaghetti

J