Tuesday, 28 June 2011
Sunday, 26 June 2011
More Front Suspension... Now With Shiny Bits!
Joe (the Champion) came out today and the rest of the front suspension came out.
The "patented" JRDCompressedSpringRetainer worked on the RH side as well as it did on the left.
Much scraping, wire-brusing, oil-removing ensued...
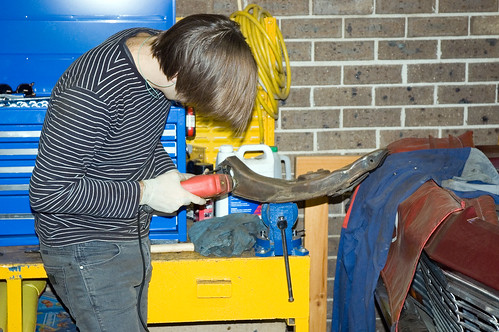
to the point where we could hit the control arms and springs with some black acrylic... shiny!
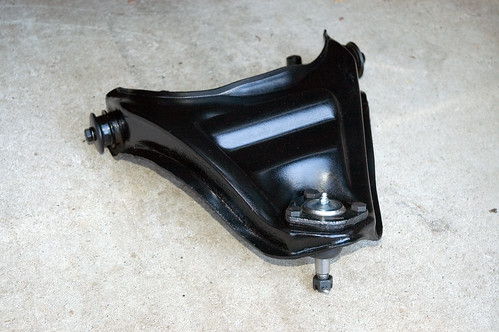
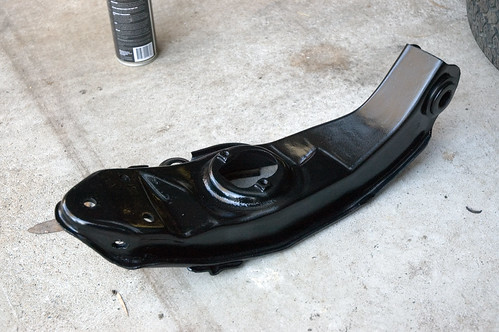
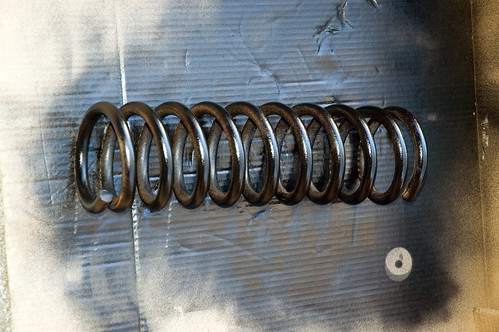
Next is to take the control arms to a mechanic and see if they can finish pressing in the bushes.
The "patented" JRDCompressedSpringRetainer worked on the RH side as well as it did on the left.
Much scraping, wire-brusing, oil-removing ensued...
to the point where we could hit the control arms and springs with some black acrylic... shiny!
Next is to take the control arms to a mechanic and see if they can finish pressing in the bushes.
Friday, 24 June 2011
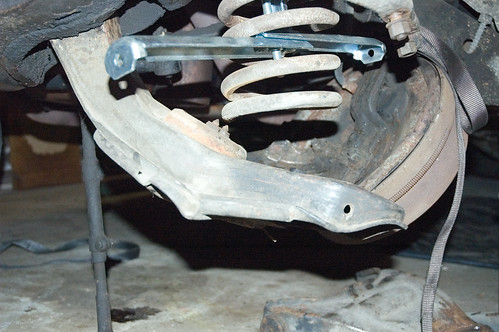
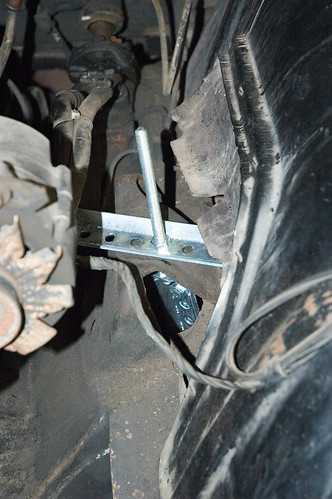
Spring Compressor
Jacked up the lower control arm to compress the spring. Used a threaded bolt through the shock absorber to hang two offset brackets off a coil near the base of the spring and did up the bolt at the top of the tower. Lowered the jack and the spring held! (So far...)

Wednesday, 22 June 2011
Sunday, 19 June 2011
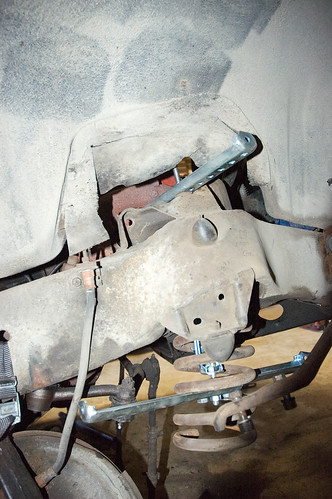
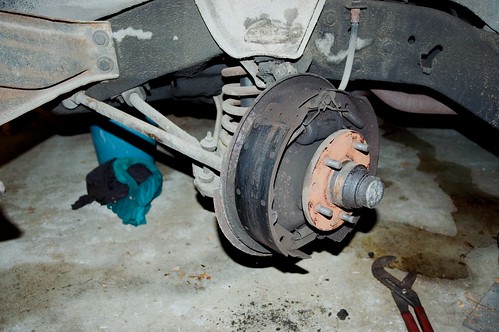
A Start on the Front Suspension
Joe (the champion) was back on Sunday and completly stripped the front suspension, save the front springs (need a spring compressor).
His front shocks from the HT Monaro will be a straight replacement, bonus!
All ball joints were removed. Joe pressed out the bushes from the first upper control arm and pressed in new ones.
A couple of glitches...
![]()
So, to move forward:
His front shocks from the HT Monaro will be a straight replacement, bonus!
All ball joints were removed. Joe pressed out the bushes from the first upper control arm and pressed in new ones.
A couple of glitches...
- At one stage a towie has hooked around the front cross member and has crushed the brake line. That will need replacing.
- The sway bar link bolts are ~ 3 cm too long. Need to get onto the supplier for replacements.

So, to move forward:
- get spring compressor
- remove lower control arms
- press out lower control arm bushes
- get replacement sway bar links
- bolt it all together again!
Saturday, 18 June 2011
Saturday Stuff
The good news is the pressure sprayer is fine; was simply missing a critical component.
Attached the earth strap to the passenger side rocker cover. Now the alternator is charging at 13.8V at the low lopey idle it has when it is cold - and 14.5V when it has warmed somewhat and is idling slightly quicker, but smoother.
Backed it out and pressured sprayed the undercarriage in the driveway. Out of degreaser, so not as effective as it could have been, but we can always do it again.
Friday, 17 June 2011
Cooling System Done
Joe (the Champion) came around today to finish off the radiator install by fitting a new thermostat, refitting the thermostat housing and top hose.
The other plan was to pressure spray the undercarriags, but pressure sprayer no work. Engine degrease instead.
The other plan was to pressure spray the undercarriags, but pressure sprayer no work. Engine degrease instead.
Thursday, 16 June 2011
ID
From what I can make out, my Impala is a...
Division: Chevrolet (1)
Series: Impala V8 (64)
Body Style: 4-door Sport Sedan (39) i.e. pillarless
Model Year: 1965 (5)
Assembly Plant: Janesville, WI (J)
Production Sequence: 10xxxx
Trim Code: 811
The original color of your interior is: Black.
Material type is: Cloth & Vinyl.
Seat type: Bench.
Used for: Impala coupes & sedans.
Black
Lucite® Code - 88 (semi-gloss) and/or?
Black
Lucite® Code - 4428L (flat)
Paint Code: N
The original colour of your car is: Madeira Maroon Metallic
Lucite® Code - 4624LH
Dulux® Code - 181-97213M
The paint code is actually N-N which designates the exterior colour as Madeira Maroon Metallic all over (top and bottom).
Trunk Colors (spatter finish)
Gray 389-195
ACC Code:
Group 1
W: Tinted windshield (only)
Group 2
M: Powerglide
P: Push-button radio
P: Back-up lights
P: Remote mirror
S: Rear manual attenna
Group 3
C: Padded Dash
Wednesday, 15 June 2011
Monday, 13 June 2011
Progress
Reverse flushed the engine block, and the heater core (seperately). Both were pretty darn clean... but now even cleaner. The more I work on it, the more I realise the Chev has been well maintained in its previous life.
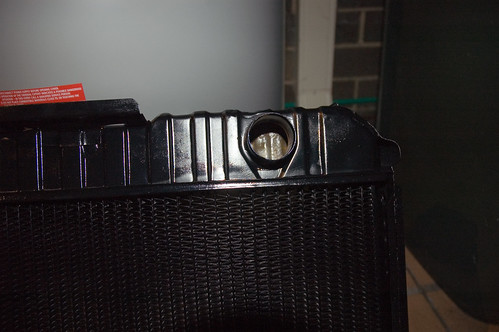
Fitted the recored radiator and connected it up, save the top hose and thermostat housing; still need to clean up the gasket surfaces a bit more and get some gasket paper.
Tip:
Protect the core when sliding it in past the fan by covering it in thick cardboard from the box the radiator came in (see below).
Keen to degrease and pressure clean soon.
Saturday, 11 June 2011
Alternator stuff
It looks like I have a Delco Remy alternator...
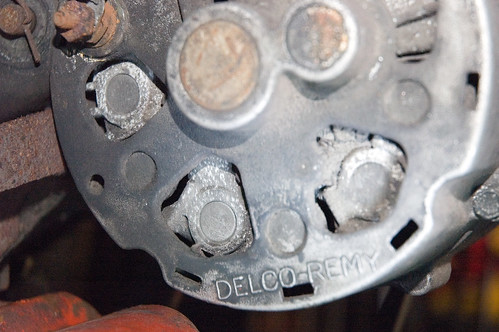
Model: 1100794
37A output
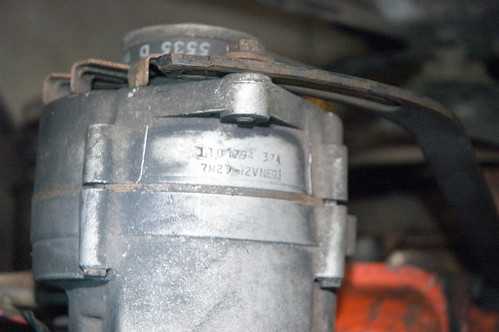
Wired correctly:
BAT = red
F = dark blue
R = black
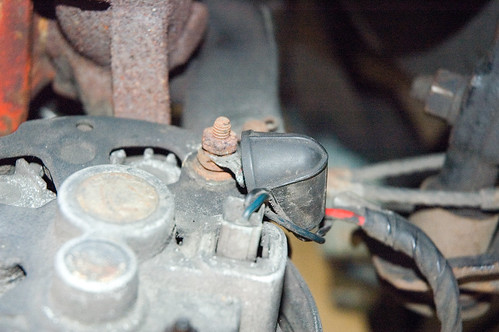
But nothing off the ground (GRD) terminal. This used to go to the (now deleted) external regulator. Perhaps it now grounds through the alt body, through the alt bracket to the block? Hmmm... but we have found an earth strap disconnected twixt the firewall and the engine (attached to the rocker cover I believe... more digging required).
Once up and running, I must try running a lead from GRD to the body... and reconnect the earth strap!
Model: 1100794
37A output
Wired correctly:
BAT = red
F = dark blue
R = black
But nothing off the ground (GRD) terminal. This used to go to the (now deleted) external regulator. Perhaps it now grounds through the alt body, through the alt bracket to the block? Hmmm... but we have found an earth strap disconnected twixt the firewall and the engine (attached to the rocker cover I believe... more digging required).
Once up and running, I must try running a lead from GRD to the body... and reconnect the earth strap!
Friday, 10 June 2011
Chasing Current
So with a bit of time this evening, it was time to see why the battery went flat.
Out with the trusty multimeter.
Here are the results:
Off 0.00 A
Acc 1.75 A
On 5.37 A
Off 0.00 A
Acc 1.74 A
So basically it looks like I am a goose and my hunch is right... I left the ignition on accessories and (at least) the Gen warning lamp in the dash drew 1.75 amps.
But should the Gen warning lamp be on in Acc? Doesn't sound right and will surely have something to do with the high charging voltage we are getting.
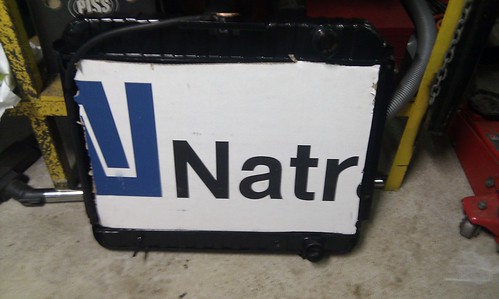
Recored Radiator
It's here!
Picked up the recored radiator from Merrylands Radiators this 'arvo. Quoted $380, charged $350... noice!
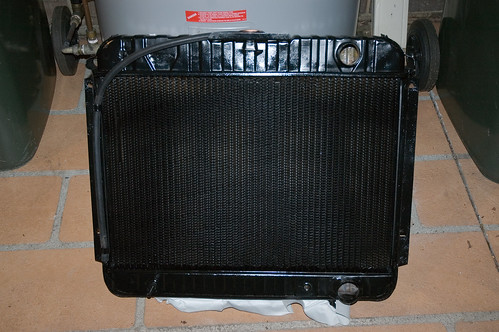
They left the short length of transmission cooler line in the bottom tank, which is good, so should be good to bolt straight back in.
It looks good! Mmmm... shiny...

Now to find some time on the weekend to drop it in.
Picked up the recored radiator from Merrylands Radiators this 'arvo. Quoted $380, charged $350... noice!
They left the short length of transmission cooler line in the bottom tank, which is good, so should be good to bolt straight back in.
It looks good! Mmmm... shiny...
Now to find some time on the weekend to drop it in.
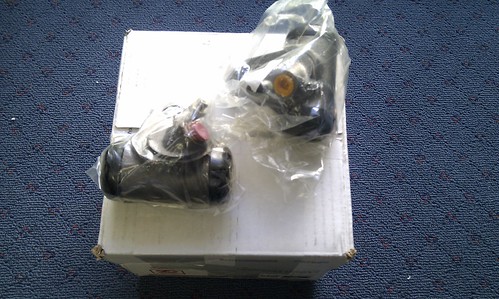
Deliveries
ETA's
Radiator: 10.06.2011 (Today!)
Centre Link: 24.06.2011 (on back-order)
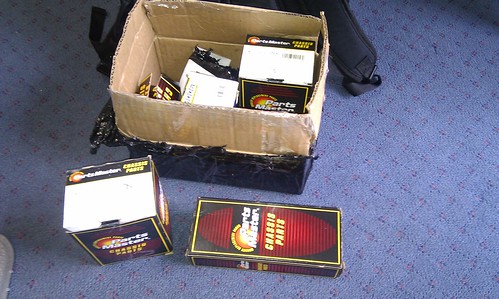
Suspension Kit: 15.06.2011
Wheel Bearings: TBA (from the states)
Wheel Cylinders: TBA (from the states)
Radiator: 10.06.2011 (Today!)
Centre Link: 24.06.2011 (on back-order)
Suspension Kit: 15.06.2011
Wheel Bearings: TBA (from the states)
Wheel Cylinders: TBA (from the states)
Tuesday, 7 June 2011
Wheel Info
Found these listings of GM rally wheel codes...
Chevelle Stuff
G3GM
Also some info on wheel dimensioning (nothing new, but might come in handy)...
https://www.rsracing.com/tech-wheel.html
Chevelle Stuff
G3GM
Also some info on wheel dimensioning (nothing new, but might come in handy)...
https://www.rsracing.com/tech-wheel.html
Sunday, 5 June 2011
Another work day
Joe (the champion) flew solo today, finishing the hunt to find suspension items to replace for rego. The "To-Do" list has been updated and it looks like it is time to start melting the credit card.
The battery tray also came out and some rush tidied up (read ground off).
The battery tray also came out and some rush tidied up (read ground off).
Saturday, 4 June 2011
Cleaning
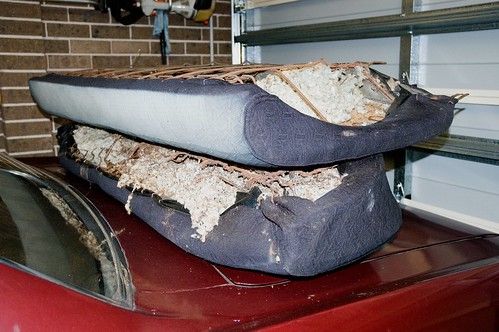
Today was supposed to be clearing out the cotton waste from the rear seat and searching for any current draw when the car is off.
The cleaning job was big but well worth it, the cotton waste/rubbish in there was disgusting! Looks good now...
Because it took so long to clear out the seats, the hunt for any sneaking current leaks will have to be for another day.
The cleaning job was big but well worth it, the cotton waste/rubbish in there was disgusting! Looks good now...
Because it took so long to clear out the seats, the hunt for any sneaking current leaks will have to be for another day.
Friday, 3 June 2011
Friday Fiddling
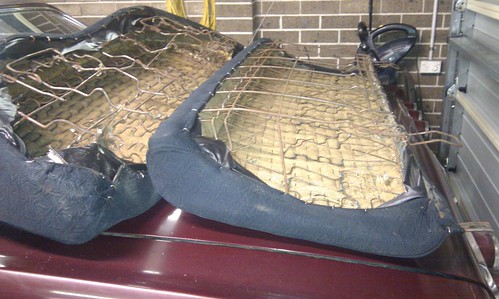
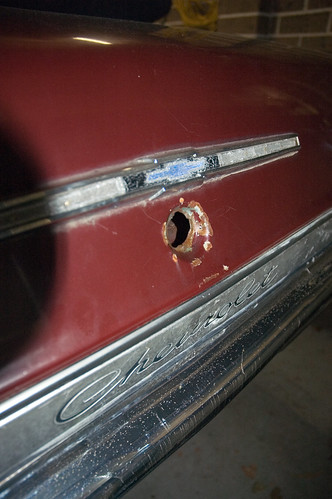
Joe (the champion) had the day off on Fri so headed north to do some Impalage. As we were unable to open the boot lock, the rear seats came out to give access to the boot interior. Joe removed the lock from the inside, so it is back to old HR days of opening the boot with a screwdriver.
A set of keys were on the floor of the garage when I got home... from the boot I guess?
A side discovery in removing the seats was a whole bunch of (what looks like) cotton waste stuffed under the seat base and back. Previous owners attempt at sound deadening perhaps? Anyhows, it looks like mice/rats had taken up residence at some stage in the Impala's past as there were nut shells and seeds all through the cotton waste. Not nice.
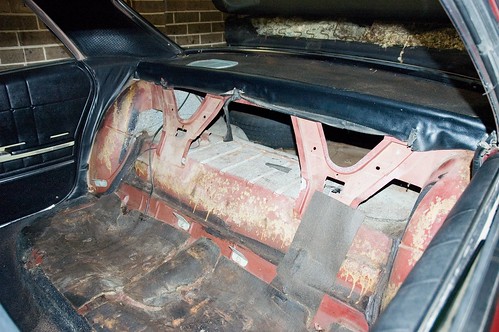
The interior is beautiful! Really good condition floor metal.
The axle stands were pushed into action and the Impala now sits off the floor with the LS wheels off.
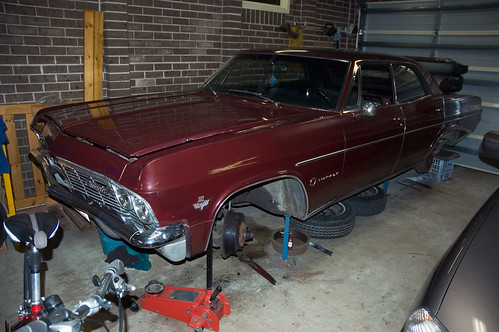
There is evidence of the LF wheel brake cylinder leaking, so that we'll replace both front brake wheel cylinders. The front brake assemblies will come off and be cleaned in brake cleaner.
An inspection of the front suspension shows the ball joints to be pretty good, with a smidge of play in one of the LF ball joints.
The sway bushes are shot, so they will be replaced (both D-bushes and ends).
The worst wear was in the steering draglink. That will need to be replaced.
A set of keys were on the floor of the garage when I got home... from the boot I guess?
A side discovery in removing the seats was a whole bunch of (what looks like) cotton waste stuffed under the seat base and back. Previous owners attempt at sound deadening perhaps? Anyhows, it looks like mice/rats had taken up residence at some stage in the Impala's past as there were nut shells and seeds all through the cotton waste. Not nice.
The interior is beautiful! Really good condition floor metal.
The axle stands were pushed into action and the Impala now sits off the floor with the LS wheels off.
There is evidence of the LF wheel brake cylinder leaking, so that we'll replace both front brake wheel cylinders. The front brake assemblies will come off and be cleaned in brake cleaner.
An inspection of the front suspension shows the ball joints to be pretty good, with a smidge of play in one of the LF ball joints.
The sway bushes are shot, so they will be replaced (both D-bushes and ends).
The worst wear was in the steering draglink. That will need to be replaced.
Rear Seat Removal
IIRC, you push back on the seat and lift up on the front. Then pull forward to remove. This will give you access to 2-3 bolts that hold in the bottom of the back. Remove bolts, swing bottom out, and lift up.
Wednesday, 1 June 2011
Subscribe to:
Posts (Atom)